Cherokee 0.6.0 and Django
Posted 30 March 2008In this post, I'll detail how to set up Cherokee with Django using FastCGI.
I'll be working under the following assumptions:
- Python, Django, and flup are properly installed on your system (I'm currently running Python 2.5.1, Django 0.96.1, and flup 1.0)
- You don't have root, and/or want to run Cherokee only in a development environment
So then, let's begin!
Installing Cherokee
In a terminal, change to the directory to which you downloaded Cherokee 0.6.0, and run these commands to install Cherokee in ~/apps :
$ tar -xzf cherokee-0.6.0.tar.gz
$ cd cherokee-0.6.0/
$ ./configure --prefix=$HOME/apps
$ make
$ make install
$ mkdir ~/apps/var/log
$ mkdir ~/apps/var/run
We made those two directories at the end so that Cherokee can write to access and error logs, and start and stop Cherokee from our web browser.
Starting a Django project
We'll need a Django project to work with. Let's create one in ~/project.
$ cd ~
$ django-admin.py startproject project
Couldn't be simpler. Of course, if you already have a Django project, take note of its path (and especially the path leading up to the project; in our case we need to remember the path of our home directory: /home/user ).
Configuring Cherokee
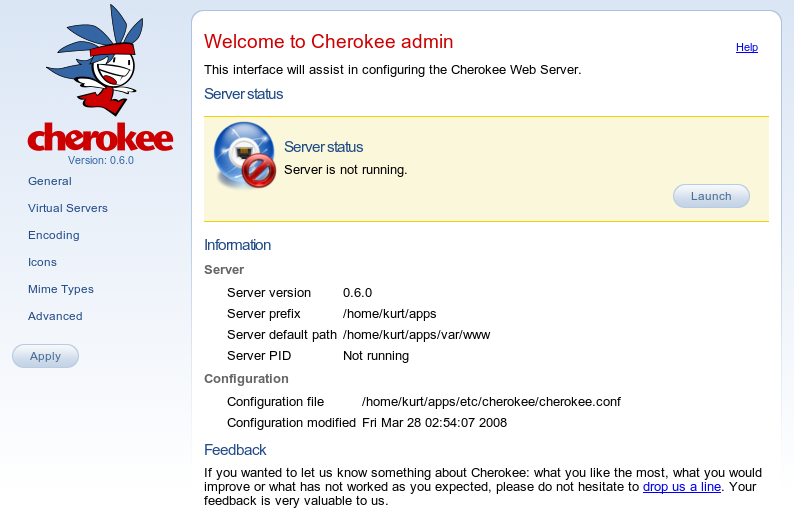
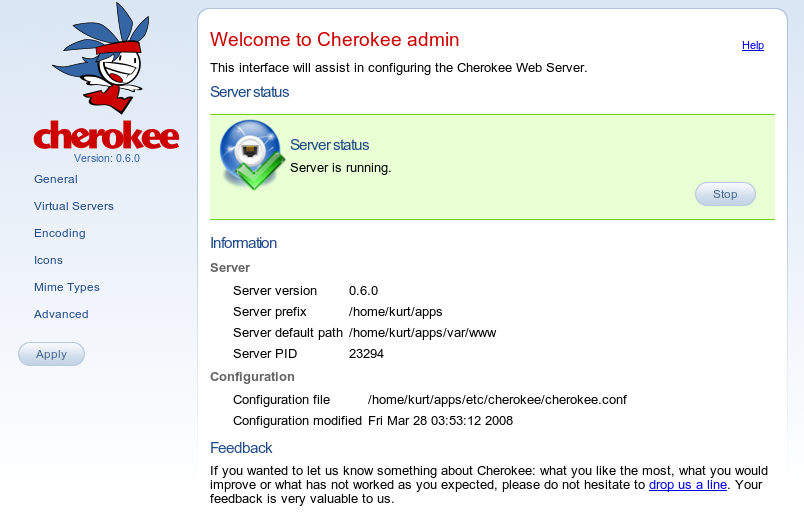
Alright, time to try out the new Cherokee admin console!
$ ~/apps/sbin/cherokee-admin
Now open a web browser and go to http://localhost:9090/. You'll see something like this:
Let's first customize the settings in the "General" page:
- Port: 8080 (must be above 1023, since we don't have root)
- Port TLS: 8443 (in case we set up HTTPS later)
Click "Submit". Note that this does not save our changes to Cherokee's configuration file! This merely saves our changes temporarily. You must click "Apply" to permanently save your changes.
Next, open the "Virtual Servers" page:
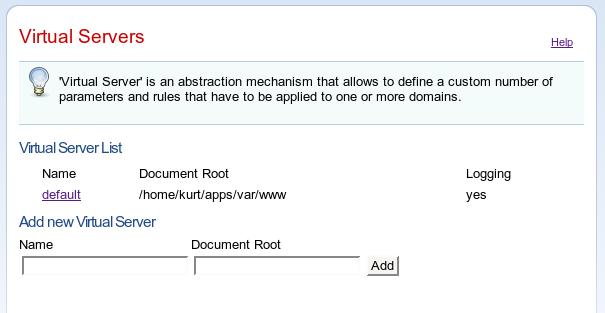
Cherokee requires that the "default" virtual server (or "vserver") always exist as a fall back, but it is possible to create other virtual servers. Thus, you could create a second vserver, bound to a particular domain (like "beta.kurtmckee.org"), that functions under a completely separate set of rules. We won't explore that here, but I recommend exploring it further. For now, let's focus on customizing the "default" vserver. First click on its name in the "Virtual Server List".
You'll be presented with six different sections, starting with "Basics". Let's skip directly to "Behavior":
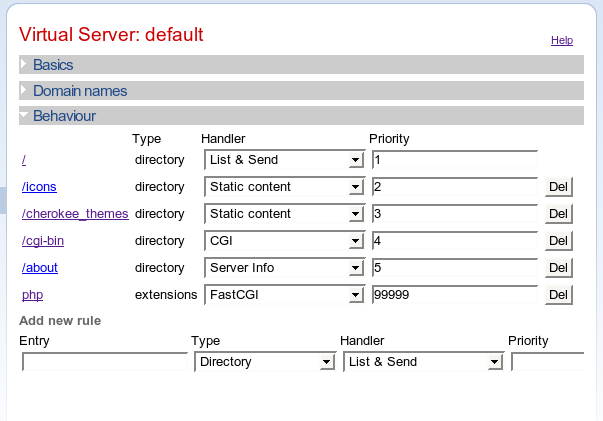
You see that there are a number of rules already defined for us. By default, Cherokee is configured to run PHP applications like Wordpress or Gallery, but we want a comprehensive Django-based solution! Be sure to study the default rules before continuing, as these rules are very informative, and you'll surely want to customize things later (perhaps by running other software alongside your Django project). For instance, you should notice the "Priority" column -- the larger the number, the sooner the rule is applied.
OK, so go ahead and delete every rule except the first (the '/' directory rule, priority 1). Then, click on the '/' link (it's very small). You'll be presented with this screen:

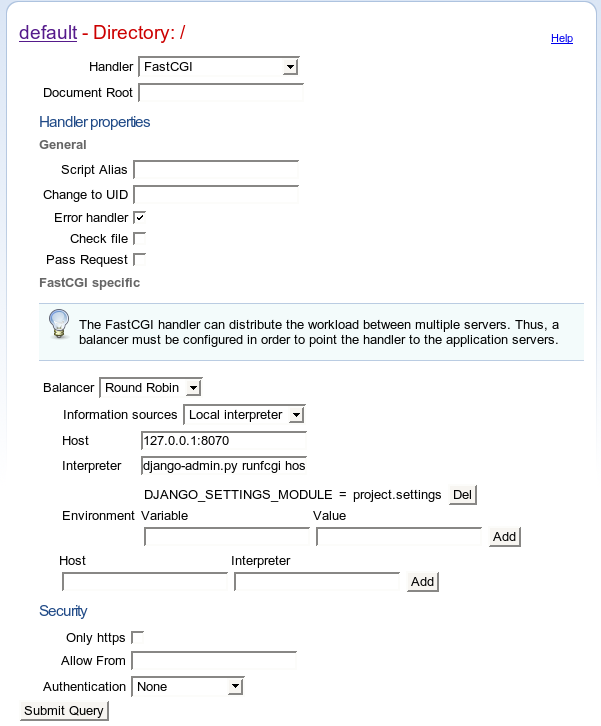
Change the "Handler" to "FastCGI", and you'll be presented with this screen:
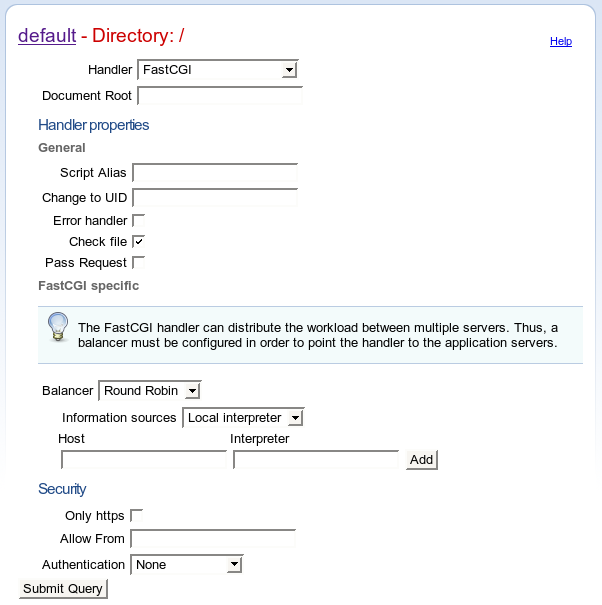
Make absolutely sure to uncheck "Check file"! I have yet to figure out why, but if this is left checked, the variables that your Django application will see will be seriously b0rked up. You should also check "Error handler", which will prevent Cherokee from intercepting the pretty Django debug output and replacing it with terse HTTP error codes. Next, enter the following for the "Host" and "Interpreter":
- Host: 127.0.0.1:8070 (or whatever port you want, but remember that port)
- Interpreter: django-admin.py runfcgi host=localhost port=8070 --pythonpath=/home/user
There are two things to note here. Number one, if you set the "Interpreter", Cherokee will be able to automatically start the Django FastCGI server if it's not already running. This is a Good Thing (TM). Second, remember how I told you to keep note of the path to your Django project? You need to change the "pythonpath" argument to the "Interpreter". Since we created the Django project in /home/user/project/ , we entered /home/user. Change the argument accordingly, and then click "Add".
After clicking add, you will see a new line which will allow you to set environment variables for the "Host" and "Interpreter" you just entered. Enter these values:
- Variable: DJANGO_SETTINGS_MODULE
- Value: project.settings
Click "Add" at the end of the line. Then, click "Submit Query". You'll see something similar to this screen:
Now click "Apply", which will save our changes to the Cherokee configuration file. You will be taken back to the Cherokee admin welcome screen, which will inform you that the server is not running. Click "Launch" and cross your fingers, because we're about to test our setup! Assuming you see the following screen, then Cherokee is now listening on localhost, port 8080.
So let's visit our new Django project, which is running at
http://localhost:8080/! If everything goes well, you should be presented
with the following screen:
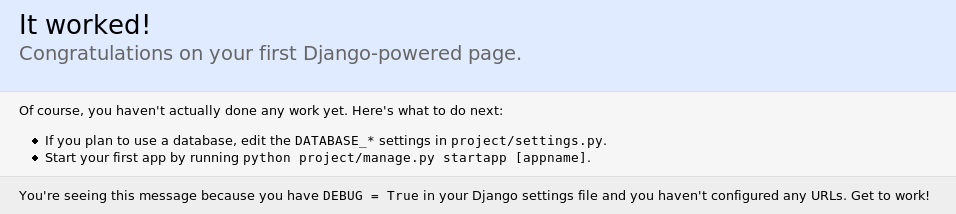
Congratulations, you've got a functioning Django FastCGI server connected to your brand-new Cherokee installation. There's just one last thing, which I'll leave as a screenshot-less exercise for the reader: when you enable Django's built-in administration, you'll find that things aren't working so well. That will be because Django is requesting media from a (surprise) /media URL. Cherokee is in turn passing this /media URL right back to Django, which doesn't help us at all. You'll need to add a second rule to the "default" vserver with a higher priority than the '/' directory rule. Here's the relevant information:
- Entry: /media
- Type: Directory (already selected)
- Handler: List & Send (already selected)
- Priority: 100 (or 2, or anything greater than the '/' directory rule's priority)
You'll click "Submit Query" and then edit your new rule, changing the
"Document Root" to the Django admin media directory on your filesystem (in my
case, that directory is located at /usr/lib/python2.5/site-packages/django/contrib/admin/media/.